 It’s a great honour to be able to present FME functionality through this blog. Sometimes new functionality is significant, even though it’s a small change. Sometimes a new feature is truly great and in a few year’s time we’ll wonder how we ever did without it.
But sometimes new functionality takes such a giant leap forwards that it improves older techniques by many orders of magnitude.
FME Server Automation is one such capability.
Why? Well consider what came before. Even the concepts of notifications are so confusing that I was really pleased when I could describe them in a clear and logical manner for our FME Server training manual. It took about three years of revisions to get right, but I finally felt I had explained the functionality as well as anyone could.
But FME is really all about simplifying complicated ideas. Although notifications are complex, our functionality needn’t be too. That’s why we came up with a new tool – Automations – for FME 2019.
As you’ll see, it’s notifications done simply, plus a whole lot more…
![]()
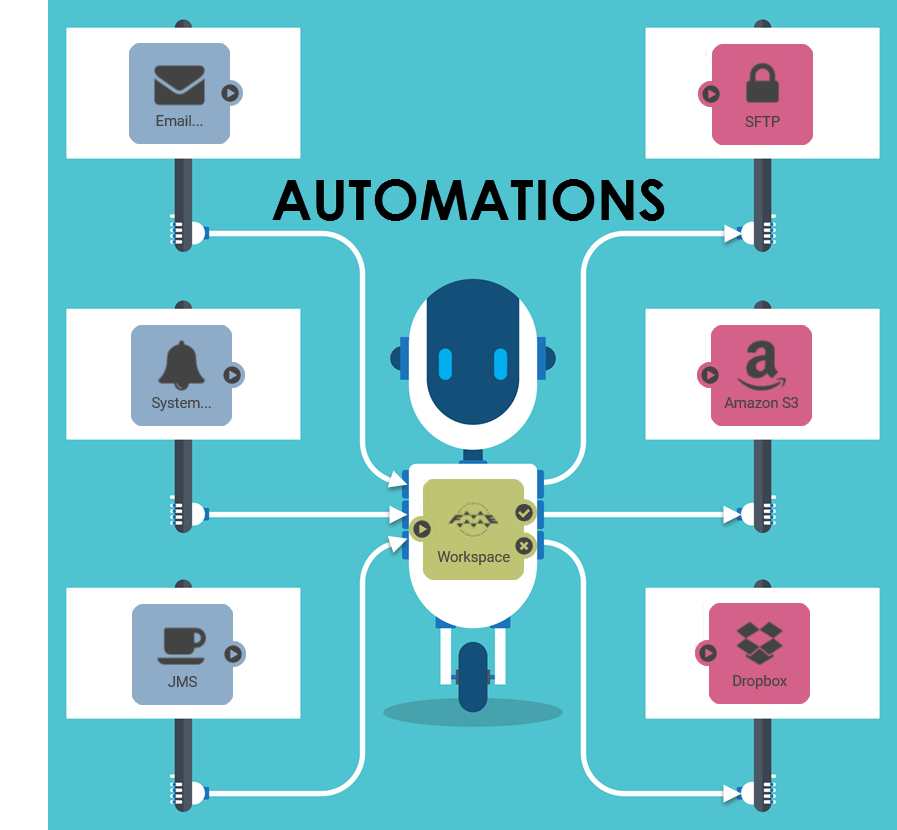
What are Automations?
Automations are a way to automate data-driven workflows using FME Server. This includes notifications, but also scheduled tasks and system events. System Events (as we’ll see) are notifications about administrative actions that take place on the Server.
So Automations combines a number of different functions into a single, new component.
But, besides drawing together a set of useful functions, what makes Automations so great is the interface. It uses an intuitive point-and-click, web-based interface to define automation graphically, like so:
If you understand how to use flowchart-style tools (yes, just like FME Workbench) then using Automations will be very simple. Let’s take a look how to get started…
Note: I used a beta version to take these screenshots, so – as marketing folk would say – all pictures shown are for illustration purposes only. The actual product will likely differ in color and terminology!
![]()
Getting Started with Automations
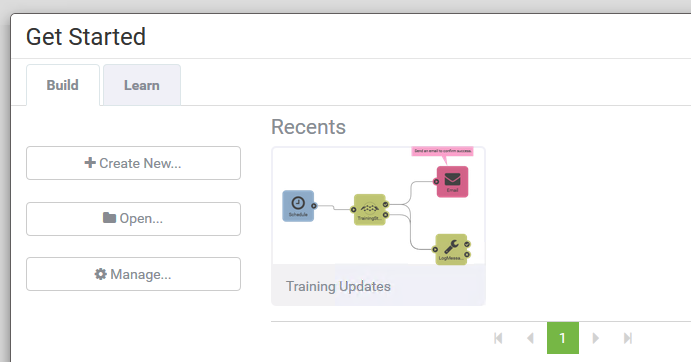
When you choose Automations on the FME Server menu, you open a dialog in which you can open existing Automations, or create a new one:
Creating a new Automation closes the dialog and sets up an empty canvas (yes, like Workbench we call it a canvas). There is a menu and toolbar at the top:

…and a small set of buttons at the bottom:
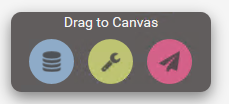
Those buttons are tools to define a Source, an Action, and a Destination (again this terminology is liable to change by release). They are drag-and-drop meaning I can place them like this:
Now let’s see what each of those means…
![]()
Sources
A Source provides input to the Automation. As I mentioned, this is a combination of various tools, so it may be a Scheduled Task, a System Event (more on that shortly), or any one of a number of Notification types. By clicking on the object a menu opens on the right for you to select the source type and parameters:
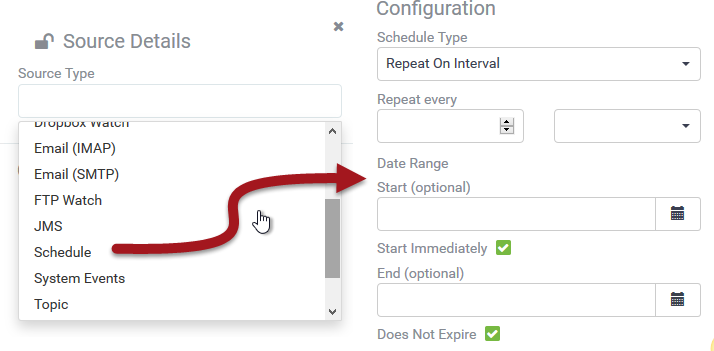
In this example I add a Scheduled task. When that source is triggered, it – in turn – triggers the next step of processing, which is usually an Action…
Actions
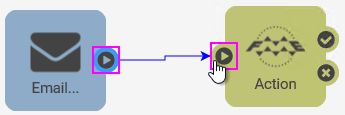
Now let’s put an Action down. Firstly notice that objects have input/output ports, so we can easily connect the action to the source:
Checking the Action parameters I can see a number of options:
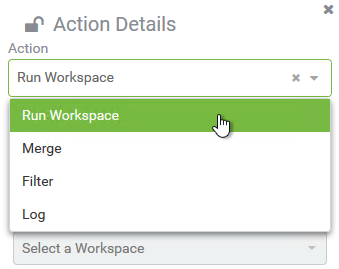
Obviously Run Workspace is the key tool. It lets me run any workspace through a familiar-looking dialog:
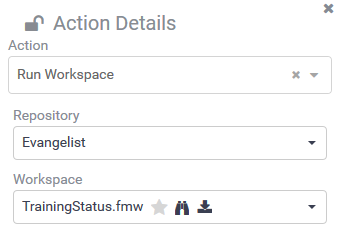
…which, of course, ties in FME Workbench and all of its 500+ transformers to your online workflows (but that’s another story).
On top of that, check out the Success/Failure output ports on a Run Workspace action:
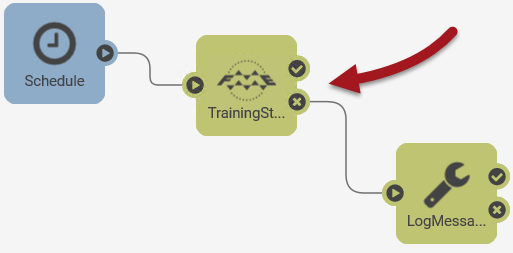
That means I can easily take actions without having to manually set topics (or publications, publishers, subscriptions, or subscribers)!
I can therefore chain one workspace after another, or – as above – send failed results to a Log Message action.
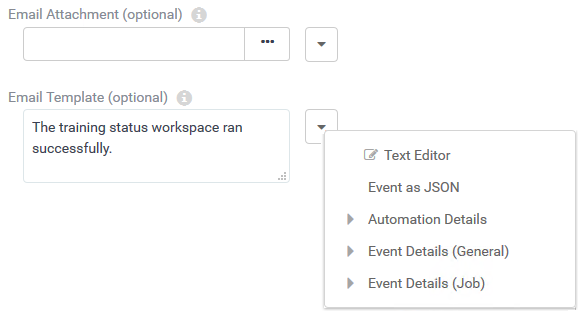
The Log Message action has a fantastic Text Editor built in (click to enlarge the below image):
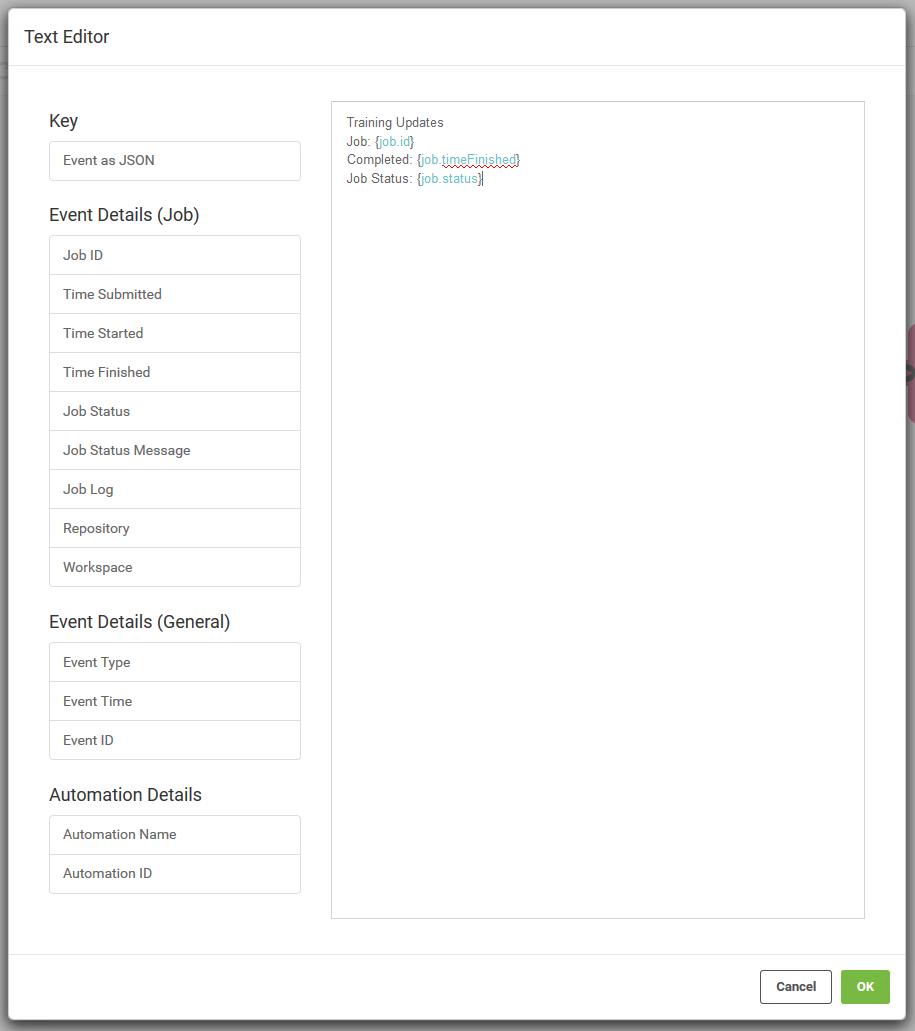
…plus I can also choose where to write the file; for example I write my log file to $(FME_SHAREDRESOURCE_LOG)/TrainingUpdateLog
The other two Actions are Merge and Filter, but I’ll talk about those shortly. For now let’s look at Destinations…
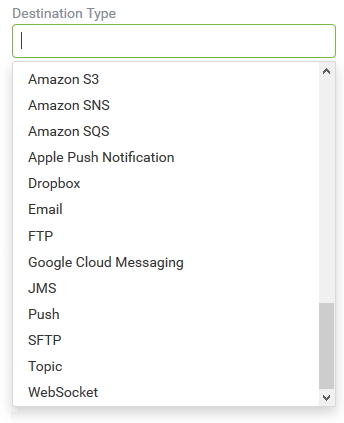
Destinations
A Destination is like the writer for an Automation. As you can imagine, most of these are notification-type destinations:
So a Destination is triggered by an incoming alert from an Action. Or – I suppose – you could skip the Action completely and go straight from Source to Destination.
Saving and Enabling
Once your automation is complete it may be saved (including a number of tags) and then enabled:
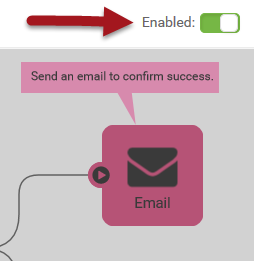
Consider, that for all the similarity, this is not like Workbench and its Run button. These are automated tasks that handle input from other processes, and they could be triggered at any time. It’s important to be able to disable a workflow while it is under development, and enable it only when ready.
The Enabled button allows you to do this. In fact it not only enables the automation, but also makes it read-only. Further editing can only be made once the Automation is disabled once more.
This way a workflow cannot be triggered at the same time that you are making edits. Additionally it allows an author to disable the Automation temporarily for other reasons.
![]()
Event Keys
In a graphic interface, one vital requirement is for each object to receive information from the previous one. Take FME Workbench. If I generate an attribute in one transformer (the AreaCalculator for example), that attribute becomes available to the next transformer in sequence (say the StatisticsCalculator):
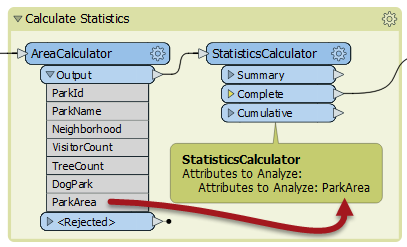
The same is true here. Information passes between components in an Automation using something we call Event Keys.
The best explanation is to show an example. Here is the configuration dialog for a Run Workspace action:

This is how the Action object receives information from the Source object. There are multiple pieces of information about the event that may be passed on. In the case of a Run Workspace action, these Event Keys are passed into the workspace using – you guessed it – published parameters.
Let’s think about what this really means. Traditional notifications can pass information to published parameters, but not in as simple a manner. Also, traditional notifications only pass email content as raw JSON. Here you can choose to receive (for example) Email Subject or Sender as actual values. It isn’t buried inside a complex JSON string that needs deciphering inside your workspace!
The available Event Keys depends on which type of source is used. An Email source would supply the email subject (for example) whereas a Directory Watch source would supply a file name and path.
The parameters for a Destination can also receive information from Event Keys:
…which again makes it easier to pass information between components without having to resort to JSON.
![]()
Filters and Merges
Now let’s return to the Action objects, specifically the Filter and Merge actions.
The Filter action is a very basic version of the Tester transformer. It allows you to carry out basic tests:
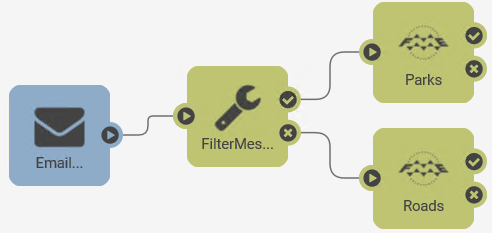
Because it has the same capability to access Event Keys, I can (for example) test the Sent To address of an incoming email, and redirect it accordingly. In the above Automation, I decide whether to run one workspace or another, on the basis of a Filter action (say on the incoming email address).
The Merge action is obviously the opposite:
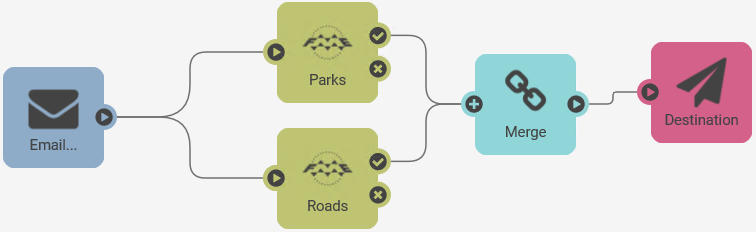
What isn’t obvious, though, is why a Merge is necessary.
The reason is that one Source can trigger multiple actions; for example in the above Automation, one incoming email triggers two different workspaces. If both workspaces were connected directly to the Destination, then both would trigger that Destination. There would be two output notifications.
But if the requirement is for a single output notification, then the Merge action can be used. It not only merges the workspace results, but it holds the entire process until both workspaces are complete. Think of it as a combination FeatureJoiner and FeatureHolder in Workbench.
So, in short, the Merge action is a way to control the flow of actions in an Automation.
![]()
System Events
The input types to a Source are scheduled tasks, various types of notifications, and System Events. Notifications and Scheduled Tasks you will be familiar with, but System Events is new for 2019.
System Events are – obviously – notifications that a certain action has occurred on the server as a whole:
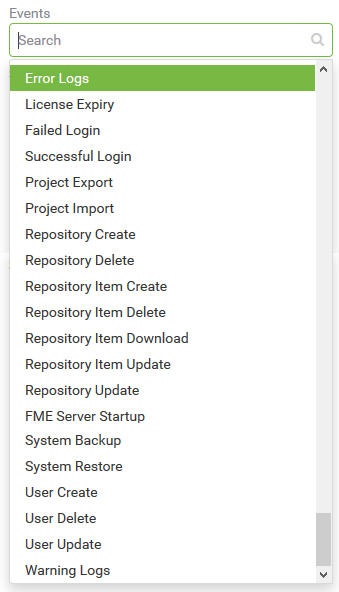
They’re likely to be more administrative alerts than anything relating to data processing. The most obvious Destination for such as event would be an email to the system administrator; for example to let them know that the FME license is close to expiry, or has expired.
![]()
Benefits over Notifications
The benefits of Automations over a traditional notification setup are easy to identify.
Firstly the range of inputs and outputs is greater than traditional publishers and subscribers. Next, the setup is much easier to implement and much easier to visualize because of the graphic interface. Finally, the whole notification workflow is greatly simplified because topics are all handled automatically.
For existing users another bonus is that Sources and Destinations can be topics. Therefore you can take a new Automation and tie it into existing Notification setups. And the Notifications setup still exists in case you still wish to use it.
And one other feature – that might not be obvious – is that the functionality was specifically designed to operate in parallel. If a single Source email (for example) starts four separate workspaces:
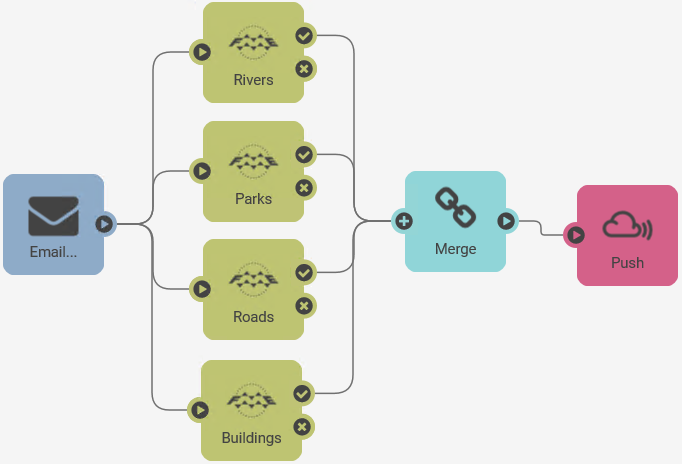
…then FME assigns each workspace to a different engine. The Automation tool submits the jobs and waits for them to complete (using the Merge action).
Plus (continuing my example) if four emails arrived simultaneously, that would start up four separate Automations. Each of those Automations would run four jobs on (potentially) a total of sixteen different engines. So I don’t necessarily have a queue of jobs; I get as many jobs as I have available engines.
Oh… one more thing. Automations can be saved in FME Server Projects, so they can be shared with other users more easily. That’s not particularly new, because you could do that with Notifications. However, what is new… support for FME Server Projects is coming soon to the FME Hub! So that will be another way to share your custom FME creations with other users.
![]()
Summary
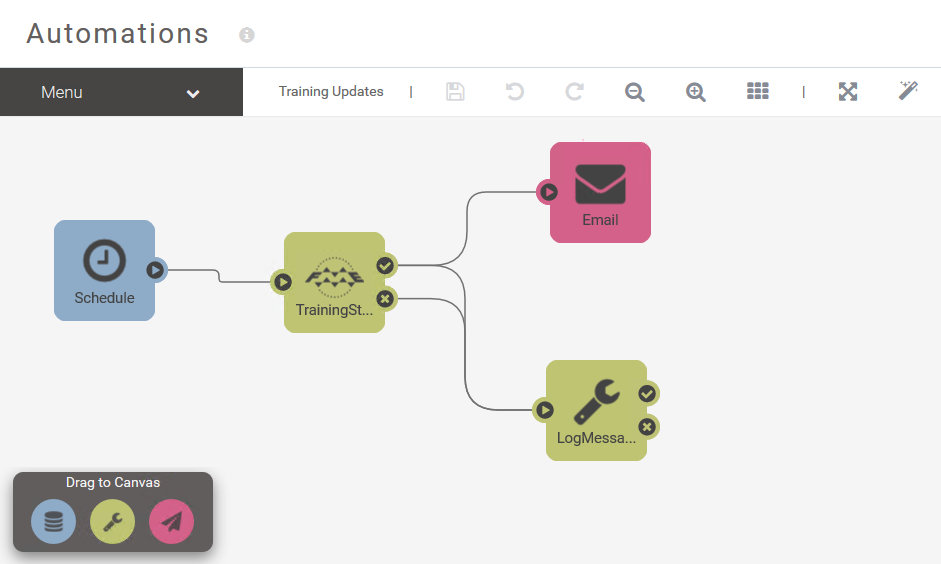
 When I first tried Automations I quickly created a workflow to message me a daily report on training course updates. It runs a workspace on a schedule, writes output to Slack (SlackConnector transformer), and sends a notification to me via email. It just felt so right and so intuitive to set up this way, and not messing about with notification topics.
As the poet Keats put it, “Then felt I like some watcher of the skies, when a new planet swims into his ken”!
Combine this with the new Workspace Viewer too in Server, and the interface looks more and more out of this world! I think it’s an amazing step forward and shows the sort of interface that we’ll see more of in the near future.
If you want to see some examples of Automations in action, then check out a recording of our recent webinar presentation. Additionally, please feel free to suggest any particular automations you would like to see. We have a resource at Safe working on demo scenarios, and we’d love to put your ideas into practice.

PS: Here’s what Dale has to say about the new Automations functionality:
The biggest step change in the FME ecosystem since Workbench burst onto the seen 18 years ago. Totally simplifies and democratizes the "Automate" part of our "Connect, Transform, Automate" slogan. Next level stuff here. Ever wondered about FME Server? This is not to be missed. https://t.co/WivnKFlDve
— Dale Lutz (@DaleAtSafe) February 5, 2019

Mark Ireland
Mark, aka iMark, is the FME Evangelist (est. 2004) and has a passion for FME Training. He likes being able to help people understand and use technology in new and interesting ways. One of his other passions is football (aka. Soccer). He likes both technology and soccer so much that he wrote an article about the two together! Who would’ve thought? (Answer: iMark)