FME 2019 can recognize objects in images, thanks to a new set of computer vision transformers. Here’s how you can train FME to recognize custom objects in large volumes of incoming raster data, with a downloadable example using stop signs.
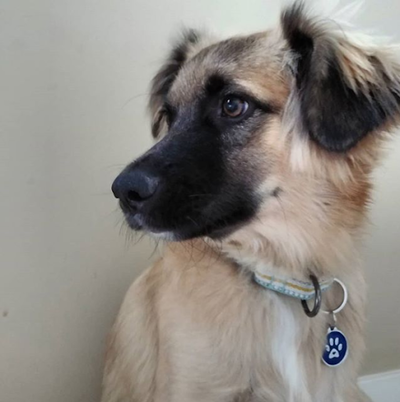
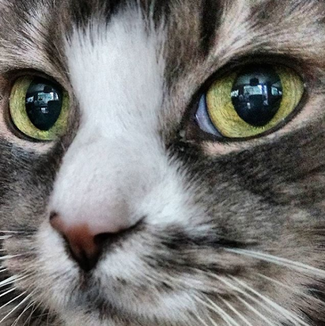
What do you see on this photo? You are probably more puzzled by the question than by the image — you see a dog here, so why am I asking such a trivial question?
It is so easy for us to see the objects on images, which are just combinations of differently coloured pixels. Our brains do an excellent job in making sense out of these combinations.
Teaching machines to find objects on images is a complicated process, but there has been a lot of research in the area of computer vision happening in the last decades. Currently, specialized software libraries are able to do many tasks that the human visual system can do, such as object recognition and identification, condition detection, text reading, and so on.
Now, with FME 2019, you also can try your teaching talent and show your favourite program how to recognize dogs, cats, or maybe road signs on the images. Does this sound exciting? Let’s dive into the details.
Training FME for Object Recognition
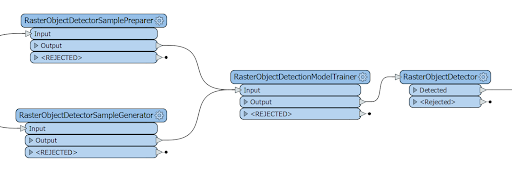
Under the hood, FME uses OpenCV, a computer vision and machine learning software library. For FME 2019, we implemented object detection functionality, which is wrapped up as a family of RasterObjectDetector* transformers:
The idea of machine learning here is to supply the program with training data—photos, in this case—on which we would identify the objects we are interested in. We also will show FME the photos that don’t have the objects we are looking for. The program, after studying the data, will learn to make decisions about a possible presence or absence of the objects on new photos that were never used during training.
The process of teaching the machine to recognize an object is a bit similar to teaching young children about the world: “This is a cat, and this is a cat, and yes, this is a cat, too. No, this is not a cat.”
The RasterObjectDetector transformer comes with a few predefined detection models for faces, body parts, cats, and some other uses, but it would be really interesting to train the model ourselves for recognizing something applicable to geospatial industry so that the results could appear on a map.
Example: Identifying Stop Signs
In practical terms, finding a suitable dataset might be the biggest problem. Most people don’t have hundreds or thousands of images of an object they would like to detect (unless it’s a collection of pictures of their favourite animal).
I have 500 photos of the FME Coin that were submitted to our contest in 2016, but there is not much practicality in recognizing this valuable FME memorabilia.

Another good source of images are videos. A single recording can supply hundreds and thousands of images, and if there is something interesting on them, we can try to extract it. A year ago, when I made a lot of experiments with video using FME, I took some video footage while driving. I also recorded the GPS tracks during those trips, so a geospatial component was there, and what can be more exciting than finding stop signs along the route? (Well, actually a lot of things can be more exciting, but stop signs are logical candidates to appear on a map.)
I found a good training dataset of stop signs here. It consists of one hundred photos of the road scenes with the stop signs (positives), and one hundred similar road photos with no signs (negatives). With all the necessary components for my scenario, I could teach FME to recognize the new object.
Preparation
Step One: Drawing Rectangles indicating the objects
The initial part is, to be honest, boring and tedious. I had to go through one hundred images and draw a rectangle around every single stop sign. FME 2019 comes with a utility called opencv_annotation.exe (part of the OpenCV library) that runs from a command line and gives a simple GUI for specifying the location of a sign (or several signs) on a photo. The utility is located in the plugins\opencv\ folder of the FME 2019 installation.
This utility is pretty peevish, and making a correct command line requires some attention. Here is an example of a working command line:
C:\apps\FME2019\plugins\opencv\opencv_annotation.exe --annotations="C:\Temp\StopSignDataset\annotations.txt" --images="C:\Temp\StopSignDataset\Positive" --maxWindowHeight=1000
The “annotations” parameter indicates where the output file goes. “Images” specifies the folder with positive photos. The last parameter indicates the maximum height of the displayed image, which is useful for high resolution photos.
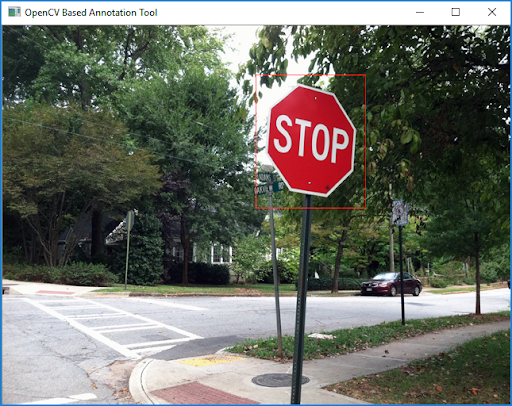
The result of this work is an annotation file containing the names of the images (note that the paths to images must be relative to the annotation file – you may need to edit the file before Step Two) and the pixel coordinates of the signs on them:
Positive\1.jpg 1 217 2 114 110

Positive\10.jpg 1 288 352 552 546

Positive\11.jpg 1 330 60 404 418

Positive\38.jpg 2 511 64 58 70 849 199 146 147
Step Two: Preparing training dataset
With the next step, we prepare the data for training. RasterObjectDetectorSamplePreparer uses the photos with and without the signs, and the annotation file for creating two new files that actually will participate in training – the Prepared Positives File and the Background Description File.
Step Three: Training
The final step of the training includes sending these files to RasterObjectDetectionModelTrainer and setting up parameters of the training – model type (HAAR or LBP), number of stages, parallelism and some other parameters. ‘Number of Stages’ parameter increases the time needed for processing the dataset. With its value set to 20, the training on our dataset was almost instant, whereas with 24, it took about 30 minutes. Setting the value to higher numbers leads to extremely long processing with not much improvement.
The output is an XML file, which is the trained model that is smart enough to detect stop signs on photos.
Analysis
The most exciting part is the analysis itself. Now we can give our photos to FME and see how well it can handle them.
For breaking a video into frames, I use the SystemCaller, which runs FFmpeg program (check this blog article about processing video with FME). It is important to set the quality of the images to the high (-qscale:v 2 parameter) for JPEG images, which use a lossy compression algorithm.
""ffmpeg.exe" -i "C:\temp\video\driving.mp4" -qscale:v 2 -vf fps=1 "C:\temp\images\img_%05d.jpg""
The images then can go straight to the RasterObjectDetector, which will try to find the objects.
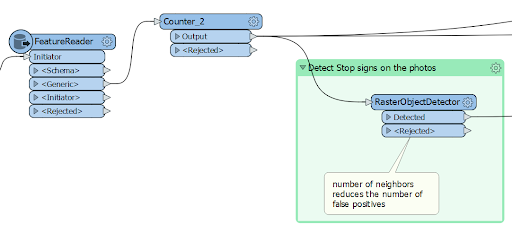
If an object is found, the transformer places a rectangle around it, and that is the output of the transformer.

Enhancing the Output
The main objective is achieved: FME recognized the stop signs on most of the photos. I picked not the best time for collecting the data because the shots taken against the sunset don’t give a clean contrast picture of the sign, so driving around noon or under the cloudy sky should return a better result. There were no false positives, which sometimes can happen. In this case, setting the “Minimum number of Neighbors” parameter to a higher value will reduce the number of errors (it also might return fewer correct results).
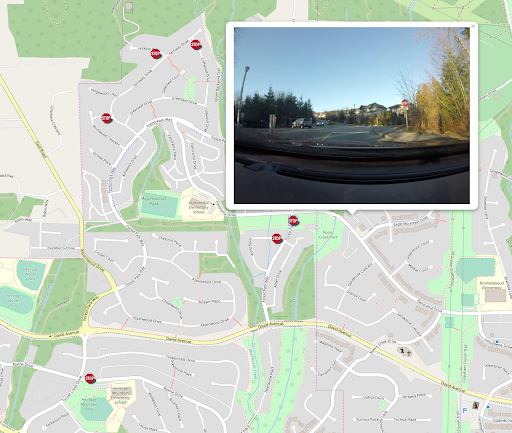
To get some real value from this process, it would be nice to know where all these recognized signs are located. For this, I used my GPS track. For more details about the workflow, check the blog article about video, but the main idea is that based on the time of the video creation, we can calculate the time when each frame was taken and match it to two closest GPS waypoints (before and after), and then interpolate the location. When a sign is detected several times, we can pick the image closest to its actual location by measuring the areas of the detected polygons – the biggest polygon is closer to the sign location than the smaller ones.
The final step of the process is placing the signs on a web map. I talked about creating simple web maps with FME and LeafletJS library during the “Tools for Visualizing Geospatial Data in a Web Browser” webinar. In short, each feature writes snippets of code for itself, and then with Aggregator and AtttirbuteCreator, FME creates the full HTML file. Here is the result of whole process.
Try it Yourself
The workspace, the model trained to recognize stop signs, the GPS track, and the images extracted from the video are available for downloading on FME Hub. Note that the training template (StopSignModelTrainer.fmwt) is included into the main template StopSignDetector.fmwt.
The role for FME community
One of the main obstacles to a quick and effective deployment of this technology is the need for large datasets of positives, and ideally, similarly looking negatives, to train FME. There is no need anymore to teach FME what stop signs look like – my training model is available to everyone – download, try it, and let me know about the results (or repeat the whole process again and maybe be a better teacher by making a model that works more reliably than mine). But there are, of course, a lot more objects that FME users will want to find in their images.
Together, the FME community can expand FME’s knowledge about the world by training it to recognize more road signs, roofs, poles, ships, or maybe cartoon characters. So if you have a good dataset and can train FME to detect new objects, how about sharing your model with every FMEer in world? Create an FME workspace template (*.fmwt) with your trained model included and upload to FME Hub.
I think object detection is really great new functionality in FME 2019. Unlike most other transformers, this new family of transformers requires some manual preparation, but the effectiveness of this solution in many areas can be enormous. Do you have ideas about what FME should be able to detect? Would you want to train FME with your own datasets? Let us know what kind of detective work you’d like to do!

Dmitri Bagh
Dmitri is the scenario creation expert at Safe Software, which means he spends his days playing with FME and testing what amazing things it can do.